Coohom has quickly become one of the most powerful design tools for interior designers, 3D artists, architects, and home-staging professionals. Whether you’re working on client projects or creating jaw-dropping portfolio visuals, Coohom offers incredible features that can significantly cut your workflow time and elevate the quality of your designs.
Below are 21 expert-level Coohom tips and tricks that every designer—beginner or advanced—should know to design faster, smarter, and more professionally.
1. Master the Advanced Renders Panel
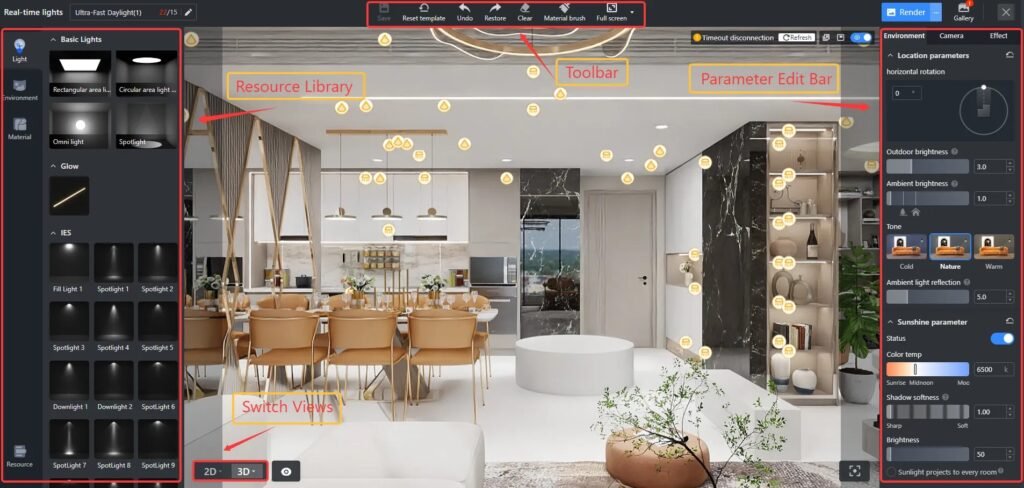
Don’t rely on default render settings. Dive into Advanced Renders to customize lighting intensity, HDRI maps, depth of field, and shadows. This can instantly improve photorealism in any scene.
2. Use Sunlight Tools for Natural Lighting
Adjust the sunlight direction, time of day, and geographic position. Getting natural light right can completely transform the realism and emotional impact of your scene.
3. Import Custom Models (If You Want Unique Spaces)
Upload your own 3DS, FBX, or SKP models to avoid the “standard Coohom catalog look.” Custom pieces make your designs stand out.
4. Create Reusable Component Groups
Save frequently used combinations—like sofa sets or kitchen modules—as Component Groups. This saves hours on large or repetitive projects.
5. Use Texture Mapping for Perfect Material Fit
For wallpapers, tiles, or fabrics, use Material Positioning to adjust scale, rotation, and alignment. This eliminates distortions and improves realism.
6. Apply PBR Materials for Ultra-Realistic Surfaces
Coohom supports PBR textures (Normal Maps, Roughness, Metalness). These produce far more realistic materials than simple color textures.
7. Leverage the Model Replacement Tool
Instead of deleting and repositioning furniture, select Replace Model to swap items instantly without losing orientation.
8. Use AI Auto-Decor for Fast Concept Mockups
AI Auto-Decor is excellent for generating quick layout ideas. Even if you refine manually afterward, this is a huge time-saver.
9. Customize HDR Environments
HDRI lighting dramatically affects reflections and mood. Try switching between Studio, Outdoor, Interior, and custom HDRs for unique scenes.
10. Master Camera Angles for Professional Renders
Use 35mm or 50mm focal lengths for realistic perspectives.
Use wide angle cautiously—it distorts rooms.
11. Create Panorama Renders for Virtual Tours
Use Coohom’s Panorama 720° to deliver immersive experiences for clients. This is great for real estate staging and presentation.
12. Use Section Tools to Showcase Floor Plans
The Cut View/Section Tool helps present structural details and layout features—especially important for architectural projects.
13. Optimize Your Scene for Faster Rendering
Too many lights, reflective textures, or high-poly models can slow down rendering. Keep scenes optimized by:
- deleting hidden objects
- reducing unnecessary reflections
- using simplified models
14. Try Different Light Combinations
Mix ambient, spot, area, and point lights for depth and realism. Don’t rely solely on ceiling fixtures—layered lighting is key.
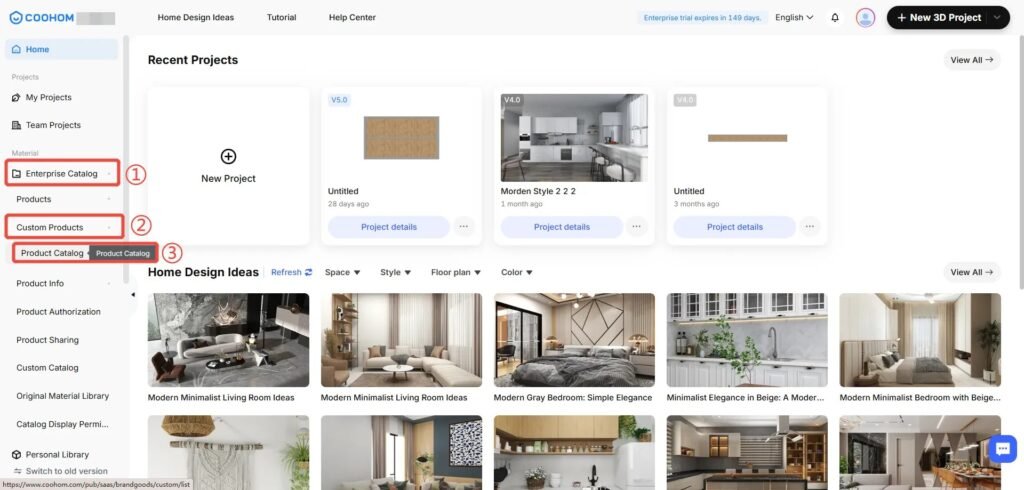
15. Customize Your Coohom Catalog
Upload your brand’s furniture or client-specific products into a private catalog. This is essential for professional designers and brands.
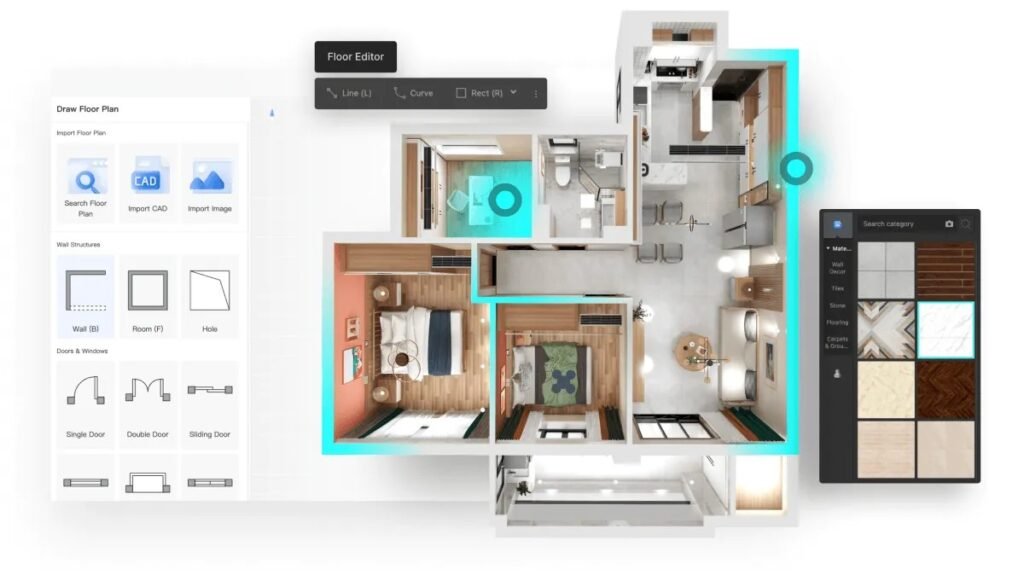
16. Use Floor Plan Recognition
Upload a floor plan image and let Coohom automatically detect walls and dimensions. This cuts layout time significantly.
17. Use Batch Rendering for Multi-View Projects
If you need several views from the same project, use Batch Render to generate them all at once instead of individually.
18. Maintain Consistent Color Palettes
Build a custom color palette and save it for reuse. Consistent palette usage gives your portfolio a polished, professional look.
19. Use the Fabric & Material Library for Realistic Finishes
Explore thousands of textures—velvet, marble, matte paint, brushed metal—to add depth and character to your designs.
20. Use Smart Doors & Windows for Accuracy
These automatically adjust to wall thickness, saving you valuable modeling time while ensuring accuracy.
21. Export High-Resolution Renders for Large Projects
When exporting, choose 4K or higher resolution for marketing materials, printed brochures, or website hero images.
21 Powerful Coohom Tips and Tricks Every Designer Should Know (Extended Edition)
Coohom is more than just a rendering tool — it’s an all-in-one design ecosystem that empowers interior designers, real estate professionals, furniture brands, and creative studios to visualize ideas with breathtaking clarity. When used correctly, Coohom can dramatically improve your workflow efficiency, design quality, and client presentation process.
Below is a deeper, extended continuation of the article with more detail, explanations, and professional insights.
Why These Tips Matter
Coohom has dozens of features hidden beneath the surface. Many designers only scratch the basics — importing furniture, positioning models, and generating renders. But the real power lies in its advanced lighting controls, material customization, scene optimization, and presentation tools.
By mastering these 21 pro-level techniques, you will:
- Work faster
- Produce cleaner, more realistic renders
- Build stronger client trust
- Create portfolio-quality scenes
- Streamline collaboration with manufacturers and teams
Let’s continue expanding on each strategy so you can unlock Coohom’s full potential.
1. Dive Deep into Advanced Rendering
Beyond clicking “Render,” explore:
- Light brightness curves
- Noise reduction options
- Camera aperture and focus
- HDR choices for mood control
Small adjustments can turn a basic render into a studio-quality visual.
2. Understand the Science of Natural Light
In Coohom, the sun isn’t just decorative — it behaves realistically.
To perfect daylight:
- Set the geographic location (e.g., New York vs. Dubai).
- Adjust the time of day for warm or cool tones.
- Use sun shadows to add drama and dimension.
Natural light is often what separates amateur visuals from professional ones.
3. Make Your Projects Stand Out with Custom Uploads
If you’re designing for a brand, showroom, or real estate project — uploading custom models gives your space identity.
You can upload:
- Furniture
- Lighting fixtures
- Decor
- Kitchen equipment
- Structural elements
By using your own assets, your work becomes more authentic and aligned with real-world products.
4. Streamline Workflows with Component Groups
Imagine creating a living room setup once and reusing it in multiple projects.
Group components are excellent for:
- Stage homes
- Hospitality projects
- Product visualization
- Retail layouts
It enables you to drag entire setups into new scenes instantly.
5. Perfect Surfaces with Material Mapping
Most designers overlook this step, but material mapping is key to achieving:
- Proper fabric grain direction
- Correct tile alignment
- Realistic scale for patterns
- Accurate reflection angles
No more stretched wallpapers or oversized marble veins.
6. Use the Power of PBR Materials

PBR stands for Physically Based Rendering. These materials contain multiple layers of data that tell Coohom how a surface behaves under light.
With PBR textures, surfaces look:
- Rough or polished
- Shiny or matte
- Glossy or brushed
- Soft or rigid
This is crucial for luxury interiors and product close-ups.
7. Replace Models Without Rebuilding Your Layout
This feature is a massive time saver. Instead of deleting and repositioning furniture, you can instantly swap one model for another while retaining:
- Rotation
- Position
- Scale
It’s perfect for rapid A/B testing with clients.
8. Use AI Auto-Decor as Your Thinking Partner
AI décor suggestions can help you:
- Break through creative blocks
- Build quick concept mockups
- Explore alternative layouts
- Impress clients with fast-first drafts
Even if you adjust everything afterward, the AI helps accelerate the early conceptual phase.
9. Experiment With HDR Environments
HDRI scenes define the overall lighting mood. Try different HDRs for:
- Product photography style renders
- Night scenes
- Cozy interiors
- Sunlit minimalist rooms
Changing HDR environments can completely alter the visual storytelling.
10. Use Professional Camera Focal Lengths
Wide angles distort proportions. To maintain realism:
- Use 35mm for small rooms
- Use 50mm for natural perspective
- Use 90mm for product close-ups
Controlling focal length is essential for magazine-like renders.
11. Create Immersive Experiences with Panorama Renders
Panorama 720° allows clients to:
- Walk through their future home
- Experience proportions
- Judge space functionality
- Make faster decisions
This is a powerful upsell for designers and agencies.
12. Use Section Tools for Professional Presentations
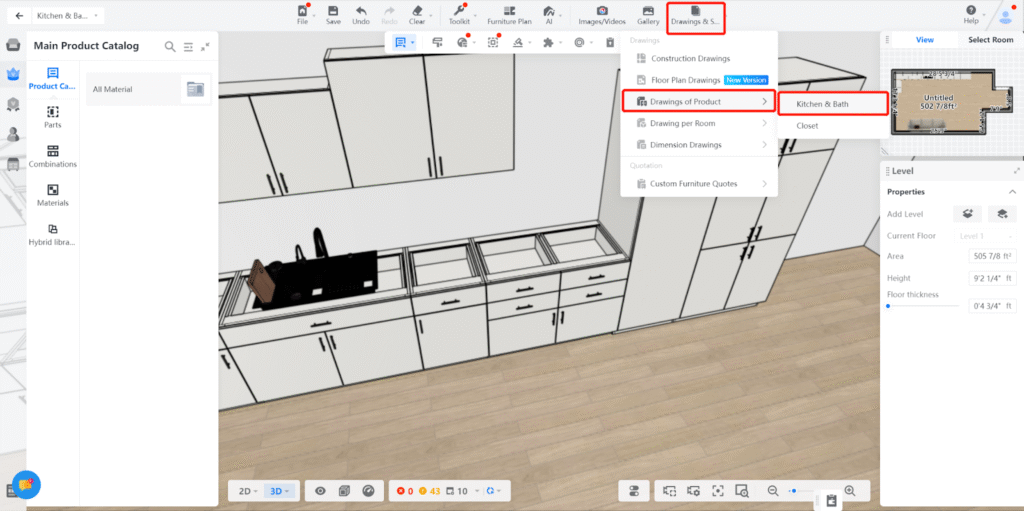
Section views help:
- Show cabinetry internals
- Demonstrate wall structures
- Present architectural ideas
- Communicate with contractors
They give your work a highly professional, technical edge
13. Optimize Your Scene for Smooth Performance
To keep Coohom fast and responsive, avoid bloating your scene.
Good optimization habits include:
- Limiting reflective surfaces
- Deleting unseen geometry
- Using simplified models for large builds
- Reducing the number of light sources
This prevents long render times and lag.
14. Create Layered Lighting
Realistic lighting = layered lighting.
Use:
- Ambient lights for general mood
- Spotlights to highlight décor
- Strip lights for modern kitchens
- Area lights for soft shadows
Layering creates depth and atmosphere.
15. Build a Private Furniture Catalog
If you’re running a design studio, brand, or manufacturing business, uploading your entire product line gives you:
- Full brand consistency
- Accurate product visualization
- Faster project planning
- Better client presentations
It’s like having your own mini Coohom library.
16. Use Floor Plan Recognition for Speed
Instead of manually drawing walls, upload any floor plan image and let Coohom:
- Detect walls
- Map corners
- Interpret dimensions
This eliminates hours of manual drafting.
17. Use Batch Rendering for Multi-View Projects
When exporting multiple angles (kitchen, bedroom, bathroom), batch render saves huge time by processing all scenes at once.
18. Build Your Own Color Palette Library
Great designers are consistent. Creating reusable palettes ensures your style remains:
- Harmonious
- Recognizable
- Professional
- On-brand
This is especially helpful when working with frequent clients.
19. Explore the Material Library Thoroughly
Coohom’s material library includes:
- Premium fabrics
- Metallic finishes
- Tiles and marbles
- Woods and veneers
- Paints and textures
Using high-quality materials is often what elevates your scenes from “good” to “exceptional.”
20. Use Smart Doors & Windows for Accuracy
Smart openings automatically scale to your wall thickness and can be adjusted for:
- Frame size
- Glass type
- Layer structure
This improves architectural accuracy and realism.
21. Export In Super-High Resolution
For marketing, billboards, and large-print presentations, always export at:
- 4K
- 6K
- Or even HD Panorama
Higher resolution = sharper details = more professional impact.
Advanced Workflows, Pro Tips & Hidden Techniques in Coohom (Extended Continuation)
Now that we’ve covered the foundational 21 tips, let’s move even deeper into Coohom’s professional-grade capabilities. These advanced techniques help you work not only better but smarter, turning Coohom into a fully optimized, production-level design tool.
Understanding the Designer Mindset in Coohom
To fully master Coohom, you must approach it with a hybrid mindset:
part interior designer, part 3D artist, part project manager.
Why?
Because Coohom blends:
- Technical precision
- Artistic creativity
- Efficient workflow management
This continuation explores how to combine all three skills to create world-class designs.
Advanced Techniques Every Serious Designer Should Know
22. Use Layer Naming & Scene Organization
Just like in Photoshop or architectural software, organization is crucial.
Rename and group elements logically:
- “Lighting – Ambient”
- “Sofa Set – Main Room”
- “Accent Decor – Shelf”
This speeds up revisions, collaboration, and client feedback.
23. Take Advantage of the 3D Warehouse Integration (Indirectly)
Even though Coohom has its own catalog, you can enhance it with models from:
- SketchUp Warehouse
- Other 3D model sites
Once imported, position them precisely using Coohom’s alignment tools.
This massively expands your design possibilities.
24. Use Collision Detection for Realistic Layouts
Collision detection prevents models from overlapping or sinking into walls, making your layout more accurate. It helps especially with:
- Cabinets
- Fixtures
- Appliances
- Built-ins
This leads to cleaner, more professional scenes.
25. Create Multiple Lighting Versions for One Scene
Instead of designing only one mood, create:
- Daylight Version
- Warm Ambient Version
- Night Scene with Artificial Lights
Client’s love seeing different emotional atmospheres.
This technique also multiplies your render portfolio without extra design work.
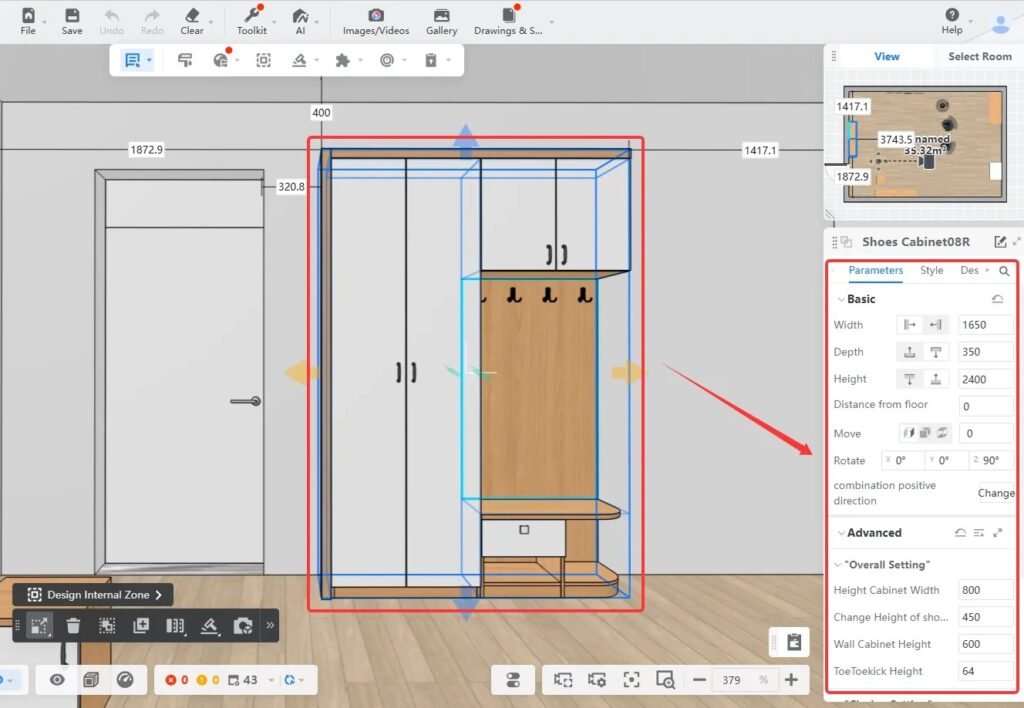
26. Use Real Measurements for Better Architectural Accuracy
Coohom allows exact measurement input for:
- Wall lengths
- Ceiling height
- Floor thickness
- Cabinet dimensions
Using real measurements ensures that client expectations match the delivered project.
27. Use Model Scaling Carefully
Coohom allows scaling models, but scaling should be used only when necessary.
Avoid “stretching” furniture too much, as it may distort proportions.
Use scaling for:
- Rugs
- Plants
- Simple geometric objects
But avoid scaling:
- Chairs
- Sofas
- Dining tables
- Cabinets
Correct scale = more realistic rooms.
28. Optimize Reflections for Maximum Realism
Reflections can make or break a render.
To enhance them:
- Add reflective floors (polished concrete, marble, tiles).
- Place area lights near reflective surfaces.
- Use HDRI with strong highlights.
- Add reflective trims like metallic edges or glass panels.
Reflections add life and vibrance to your scene.
29. Use the Shadow Softness Feature
Hard shadows = harsh, unrealistic lighting
Soft shadows = smooth, natural atmosphere
Adjust shadow softness depending on:
- Light source size
- Time of day
- Mood of the scene
Soft shadows create a cozy, inviting look.
30. Keep Your Viewport Clean
A cluttered viewport slows your design speed.
Use:
- Hide/Show Layers
- Isolate Object View
- Camera Bookmarks
This makes your design workspace much more manageable.
31. Duplicate Scenes to Speed Up Multiple Design Versions
Instead of redoing everything from scratch:
- Duplicate your scene
- Change colors, materials, and furniture
- Render again
This is great for client presentations with multiple concepts.
32. Use Real-World Material References
When creating custom materials, always use real samples:
- True wood grains
- Real marble tiles
- Actual fabrics
- Branded color swatches
This leads to hyper-realistic results and accurate representation.
33. Use Fog & Atmospheric Effects for Depth
Want a cinematic look?
Add slight atmospheric haze to:
- Open spaces
- Outdoor renders
- Large living rooms
- Commercial interiors
It creates a dramatic sense of depth and realism.
34. Position Your Camera Using the Rule of Thirds
Photography principles apply in Coohom too.
Place your focal elements on:
- The grid intersections
- Horizontal thirds
- Vertical thirds
This makes your compositions more professional and visually appealing.
35. Use Negative Space to Avoid Overcrowding
Many new designers fill spaces with too many objects.
Professional designers understand negative space — areas intentionally left empty.
Benefits:
- Clean spaces
- More luxury feels
- Emphasis on focal pieces
Coohom renders always look better with balanced spacing.
36. Work With Color Temperature Consistency
Lighting color temperature must match your design theme:
- 3000–3200K: Warm, cozy
- 4000–4500K: Soft, neutral
- 5500–6000K: Cool, modern
Inconsistent lighting makes scenes feel artificial.
37. Use Transparent Elements to Add Visual Interest
Glass, acrylic, and glossy surfaces help improve composition by:
- Creating light reflections
- Adding layering
- Breaking visual monotony
They elevate the premium look of your render.
38. Add Micro-Details for Hyper-Realism
Small details make your render feel lived-in, such as:
- Books
- Plants
- Cushions
- Lamps
- Blankets
- Table decor
But avoid clutter — balance is key.
39. Use Replace Material Tool for Instant Style Changes
Instead of replacing furniture, sometimes changing only the material is enough to transform the theme.
Examples:
- Wooden table → matte black
- Beige sofa → bold velvet green
- Marble floor → natural oak planks
This allows rapid experimentation and styling.
40. Use Global Illumination Settings for Natural Lighting Behavior
GI helps light bounce realistically in your scene.
Without GI, interiors look flat.
Adjust:
- Light bounce strength
- Color bleeding
- Indirect lighting intensity
This significantly improves realism.
Expert-Level Coohom Techniques for Professional Designers (Further Continuation)
Now that we’ve built a strong foundation with 40 powerful tips, it’s time to elevate your workflow with advanced strategies used by studio-level designers, 3D visualization specialists, and architectural professionals. These methods help you work more efficiently, produce superior renders, and create a polished, luxury-quality portfolio.
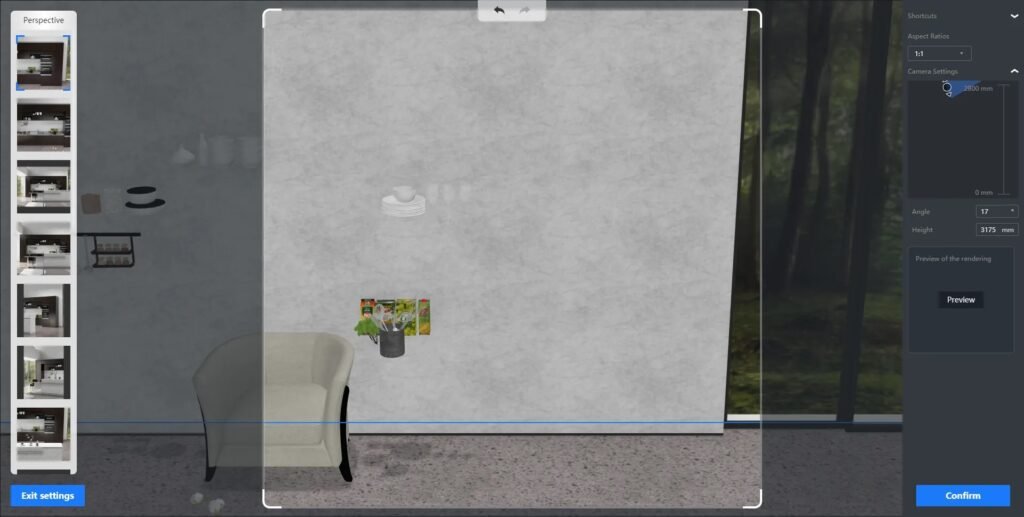
41. Use Multi-Camera Bookmarks for Fast Client Presentations
When presenting a design, switching camera angles manually slows you down.
Use camera bookmarks to save views like:
- Front view
- Dining angle
- Overhead view
- Entryway perspective
- Close-up detail shot
This makes client presentations smooth, dynamic, and highly professional.
42. Add Human Scale Elements to Improve Realism
Adding subtle human elements helps convey scale, including:
- A coffee cup
- A laptop
- Folded clothes
- An open book
- Shoes near the door
This makes the viewer “feel” the space rather than just look at it.
43. Use Coohom’s Physics-Based Lights for True Realism
Instead of relying solely on standard lights, use:
- IES lights (real-world light profiles)
- Soft area lights for studio rendering
- Backlighting for dramatic effects
IES lights replicate actual light falloff patterns, improving realism dramatically.
44. Blend HDRI and Artificial Lighting for Balanced Scenes
Relying on one lighting type creates imbalance.
The most realistic renders combine:
- HDRI for base illumination
- Sunlight for direction
- Artificial lights for warmth and detail
This hybrid method mimics real-life lighting conditions.
45. Use Color Grading After Rendering
Although Coohom offers amazing photoreal rendering, final polish often comes from:
- Mild contrast adjustments
- Warmth/coolness correction
- Slight saturation tweaks
This step makes your renders portfolio-ready and cinematic.
46. Study Real Interior Photography for Inspiration
Rendering is similar to photography. Improve your scenes by studying:
- Magazine spreads
- Retail brochures
- Luxury home photography
- Architectural blogs
Notice how real photographers use:
- Symmetry
- Depth
- Leading lines
- Natural color palettes
Then replicate these techniques in Coohom.
47. Use Slight Imperfections for Authenticity
Perfect interiors look artificial. Add small imperfections:
- A slightly wrinkled blanket
- A cushion that’s not perfectly centered
- A plant that leans a little
- A drawer left slightly open
Realism lives in the details.
48. Use Material Roughness for Light Diffusion
Glossy materials reflect sharply, while rough materials scatter light.
Use roughness adjustments for:
- Walls
- Chalky paints
- Matte wood
- Stone textures
Proper roughness = realistic surfaces.
49. Improve Floor Realism with Bump and Reflection Maps
Floors are one of the most visible elements in interiors.
Enhance them by applying:
- Bump maps for texture
- Reflection maps for shine
- Color correction for wood tone accuracy
A beautiful floor improves the entire scene.
50. Use Hierarchy Planning for Large Projects
For big houses, hotels, or retail spaces, plan the scene in layers:
- Level 1: Walls, doors, windows
- Level 2: Major furniture
- Level 3: Lighting
- Level 4: Materials
- Level 5: Decor & styling
- Level 6: Camera work
- Level 7: Rendering
This prevents overwhelm and ensures a smooth workflow.
Coohom Workflow Secrets for Faster Production
51. Use “Duplicate with Offset” for Modular Layouts
Perfect for:
- Offices
- Hotels
- Classroom setups
- Retail shelving
It creates evenly spaced furniture automatically.
52. Save and Export Reusable Design Templates
If you design frequently for the same style (modern, boho, luxury, Scandinavian), save templates with:
- Lighting setups
- Material palettes
- Camera settings
This drastically cuts project time.
53. Use Minimal Lighting for Faster Draft Renders
When testing layouts, reduce the render load by:
- Turning off extra lights
- Using basic HDRI only
- Lowering render quality settings
Then enable full lighting only for final renders.
54. Use Negative Fill for Better Light Control
To add drama, use large “blocking objects” or walls to prevent over-illumination.
This works beautifully for moody, cinematic interiors.
55. Use Color Accents Carefully
Accent colors (blue pillows, green chairs, gold frames) should follow the “10% rule” — only 10% of the room should be accent color.
This creates balance without overwhelming the viewer.
Client Communication & Presentation Strategy
56. Use Comparison Boards (Before/After)
Client’s love seeing:
- Material changes
- Layout improvements
- Style variations
- Light vs. dark concepts
Use Coohom’s consistent lighting and angles to create matching before/after pairs.
57. Provide Clients with Multiple Angles
Never show only one angle.
Client’s judge:
- Layout from overhead
- Feel of space from eye level
- Material quality from close-up shots
Use at least 3–5 camera views per room.
58. Offer Both Clean & Styled Versions
Give your client:
- A clean architectural render
- A fully styled interior render
This helps them visualize structure and lifestyle.
59. Use Animated Walkthroughs for High Engagement
Coohom’s walkthrough animations impress clients and increase approval rates, especially for:
- Real estate marketing
- Luxury homes
- Airbnb or property staging
- Restaurant or retail design
Movement helps clients understand flow and space better than static images.
Branding & Professional Portfolio Building
60. Add Your Logo & Brand Colors to Renders
Use consistent:
- Logo placement
- Watermarks
- Color palettes
- Font choices in presentations
This builds brand identity and professionalism.
61. Build a Coohom Portfolio Template
Create a standard presentation layout for:
- Render sets
- Floor plans
- Mood boards
- Concept variations
Use the same structure every time — clients appreciate consistency.
62. Use Coohom for Product Visualization
If you design furniture or décor items, Coohom can double as a 3D product photography tool.
You can create:
- Catalog images
- Lifestyle scenes
- Color variations
- Material previews
This eliminates the need for expensive photography sets.
63. Export Multiple Resolutions for Different Uses
Use:
- 4K for portfolios
- HD for web pages
- Low-res for fast client review
- Panoramas for immersive tours
Having multiple versions makes your workflow flexible and efficient.
Conclusion: Unlock Your Full Potential with Coohom
Coohom empowers designers to work faster, create hyper-realistic renders, and deliver professional presentations with ease. By mastering its tools—from basic settings to advanced workflows—you can elevate your portfolio, impress clients, and streamline your creative process. Dive deep, experiment, and leverage Coohom’s full potential to transform your design projects into visually stunning, efficient, and professional spaces.